Screener Saved Search
The new Screener feature coming to connectBLC will allow customized control of an automated search, allowing you to "screen" search results prior to sending them to your clients.
You will start on your BLC® home page and access the search page by selecting the "Search" icon in the menu:
Start creating your Listing Search.
Once you have your search created with your desired criteria, save the search by selecting "Save Search" on the right-hand side of the search page:
OR the Save Icon at the top menu of the search results page:
Once either save option is selected you will enable the Screener feature under "Listing Notifications:"
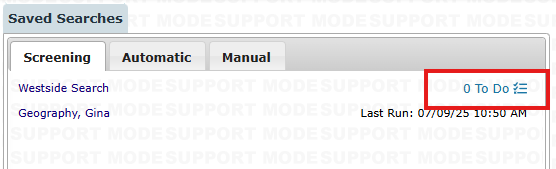
Once the search has been saved, you can access and Screen the results from the Saved Search widget, Prospecting Manager, or the Client dashboard:
From the Saved Search widget, you will see the search name, client's name, and the number of search results that are left to screen (To-Do):
Selecting To-Do will take you to the Screen Results page. On this page you will see three columns to monitor the Screen Status, Last Screened Date, and Received Date. There are also filters that you can display only the specific listings that were Rejected, Sent, or still require your action (to-do):
Select the listings to Reject and use the REJECT button on the right-hand side:
A confirmation window will display:
After rejecting the listings, the total results under To-Do will update. Now, select the listings that you want to Send to your client and use the APPROVE & SEND button on the right-hand side:
A window will display for you to edit the Message Template, Email Subject, and Message Body. Once your desired choices are made, select the APPROVE & SEND button at the bottom of the window:
The Saved Search widget will update, confirming that you have reviewed all the search results until the next search run. When the search runs again, you will see an update to Last Run and the number of To-Do listings.
By selecting the search name from the Widget, Client Dashboard, or the Prospecting Manager, you can see at a glance the Screen Statistics:
Related Articles
Extend Saved Search Expiration
You can extend a saved search’s expiration date through the Prospecting Manager. Click the Prospecting Manager icon, in the top right hand corner of the screen. The Prospecting Manager notifies you when a search has expired by putting a red asterisk ...Saved Search Concierge
After creating a search, go to Results. Click "Save". To prescreen listings prior to delivery to your client: 1. Select the Client Name 2. Create the Search Name 3. Choose "Automatic Search" 4. Choose the expiration time and notification prompt time ...Saved Searches/Templates
A non-automated saved search or search template is simply saved for your convenience until you wish to use it. These searches do not run automatically and do not send results by email (this is how they differ from automated prospecting searches). You ...Search Overview
You can perform basic and advanced listings searches from the Search icon in the menu bar of any device. You can also save searches, run saved searches, and edit any saved search criteria. You can browse listing results by toggling between different ...How Do I: Delete More Than One Saved Search at a Time?
1. Open your Prospecting Manager. 2. Choose which type of Saved Search collection you would like to edit; the system will default to "All." 3. Check the boxes next to the searches you wish to delete. If you want to delete all, choose the checkbox at ...